曹工說mini-dubbo(2)–分析eureka client源碼,想辦法把我們的服務提供者註冊到eureka server(上)_網頁設計
※台北網頁設計公司這麼多該如何選擇?
網動是一群專業、熱情、向前行的工作團隊,我們擁有靈活的組織與溝通的能力,能傾聽客戶聲音,激發創意的火花,呈現完美的作品
前言
eureka是spring cloud Netflix技術體系中的重要組件,主要完成服務註冊和發現的功能;那現在有個問題,我們自己寫的rpc服務,如果為了保證足夠的開放性和功能完善性,那肯定要支持各種註冊中心。目前我們只支持redis註冊中心,即服務提供者,在啟動的時候,將自身的ip+端口信息寫入到redis,那,我們是否註冊到 eureka中呢?
這個想法可行嗎?可行。eureka client 和eureka server間,無非是網絡通信,既然是網絡通信,那就有網絡協議,那我們的應用,只要遵照eureka server的協議來,就可以接入。
另外,eureka server沒有採用spring mvc來實現,而是採用了jersey框架,這個框架啥意思呢,可以理解為對Restful的實現。我從網上找了一段(https://www.jianshu.com/p/88f97b90963c):
SpringMVC在開發REST應用時,是不支持JSR311/JSR339標準的。如果想要按照標準行事,最常用的實現了這兩個標準的框架就是Jersey和CxF了。但是,因為Jersey是最早的實現,也是JSR311參考的主要對象,所以,可以說Jersey就是事實上的標準(類似Hibernate是JPA的事實上的標準),也是現在使用最為廣泛的REST開發框架之一。
因為eureka server採用了jersey,所以eureka client最終也是使用了配套的jersey client來和服務端通信。
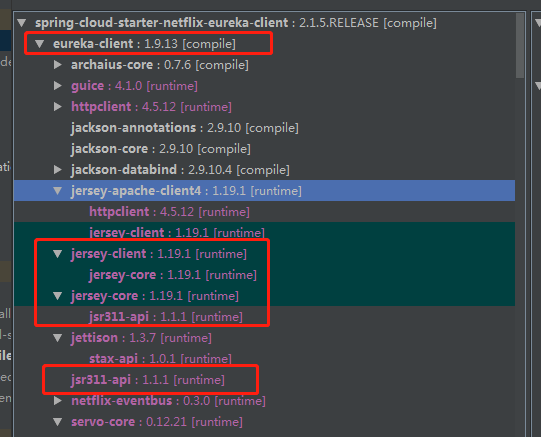
所以,eureka client,裏面其實依賴了一堆jersey的包:
注意,上面的jersey-client、jersey-core等包,其group id都是這樣的:
    <dependency>
      <groupId>com.sun.jersey</groupId>
      <artifactId>jersey-client</artifactId>
      <version>1.19.1</version>
      <scope>runtime</scope>
    </dependency>
但是,不知道為啥,eureka client中,最終並沒有完全使用jersey-client,而是使用了
    <dependency>
      <groupId>com.sun.jersey.contribs</groupId>
      <artifactId>jersey-apache-client4</artifactId>
      <version>1.19.1</version>
      <scope>runtime</scope>
    </dependency>
這個包,內部引入了:
        <dependency>
            <groupId>org.apache.httpcomponents</groupId>
            <artifactId>httpclient</artifactId>
            <version>4.1.1</version>
        </dependency>
這個包,你可以簡單理解為,jersey-client變成了一個接口,jersey-apache-client4是它的一個實現,實現里,用了httpClient去實現。
httpClient,沒有幾個java同學不知道吧?這麼做是可行的,因為你最終通信,還是http,不管你服務端框架,是jersey、還是spring mvc、甚至以前的struts,這都不重要。
所以,大家在下面的源碼中看到jersey的時候,腦海里可以有這麼一張圖。從上層到底層的接口,分別是:
CloudEurekaClient
       ...
DiscoveryClient
	...
EurekaClient
	...
JerseyClient
	...
HttpClient
在此之前,我們還是先分析下eureka client 註冊到eureka server的源碼。
源碼環境
minidubbo代碼和相關博文在:
曹工說mini-dubbo(1)–為了實踐動態代理,我寫了個簡單的rpc框架
https://gitee.com/ckl111/mini-dubbo
代碼很簡單,不過還是給個代碼鏈接吧:
https://gitee.com/ckl111/all-simple-demo-in-work-1/tree/master/eureka-client
主要就是在pom.xml中,引入:
<dependency>
    <groupId>org.springframework.cloud</groupId>
    <artifactId>spring-cloud-starter-netflix-eureka-client</artifactId>
</dependency>
然後啟動類:
@SpringBootApplication
public class DemoApplication {

	public static void main(String[] args) {
		SpringApplication.run(DemoApplication.class, args);
	}

}
源碼分析
spring.factory支持自動配置
因為前面的pom,引入了如下jar包:
		<dependency>
			<groupId>org.springframework.cloud</groupId>
			<artifactId>spring-cloud-netflix-eureka-client</artifactId>
		</dependency>
該jar包的META-INF\spring.factories中,有如下幾行:
org.springframework.boot.autoconfigure.EnableAutoConfiguration=\
org.springframework.cloud.netflix.eureka.config.EurekaClientConfigServerAutoConfiguration,\
org.springframework.cloud.netflix.eureka.config.EurekaDiscoveryClientConfigServiceAutoConfiguration,\
org.springframework.cloud.netflix.eureka.EurekaClientAutoConfiguration,\
org.springframework.cloud.netflix.ribbon.eureka.RibbonEurekaAutoConfiguration,\
org.springframework.cloud.netflix.eureka.EurekaDiscoveryClientConfiguration
我們看到,key是org.springframework.boot.autoconfigure.EnableAutoConfiguration,value是逗號分割的列表,這裏面都是需要被自動裝配的配置類,其中,我們看第三行的:
org.springframework.cloud.netflix.eureka.EurekaClientAutoConfiguration。
這個類,是自動裝配的配置類,我們可以簡單一覽:
@Configuration
@EnableConfigurationProperties
@ConditionalOnClass(EurekaClientConfig.class)
@Import(DiscoveryClientOptionalArgsConfiguration.class)
@ConditionalOnBean(EurekaDiscoveryClientConfiguration.Marker.class)
@ConditionalOnProperty(value = "eureka.client.enabled", matchIfMissing = true)
@ConditionalOnDiscoveryEnabled
@AutoConfigureBefore({ NoopDiscoveryClientAutoConfiguration.class,
		CommonsClientAutoConfiguration.class, ServiceRegistryAutoConfiguration.class })
public class EurekaClientAutoConfiguration {
裏面一堆@ConditionalOn***,主要是看該配置類是否生效。
我們不管,這裏條件是滿足的,所以,看具體java文件里有什麼要裝配的內容,裏面內容較多,我們關注我們需要關注的:
		@Bean(destroyMethod = "shutdown")
		@ConditionalOnMissingBean(value = EurekaClient.class, search = SearchStrategy.CURRENT)
		@Lazy
		public EurekaClient eurekaClient(ApplicationInfoManager manager,
				EurekaClientConfig config, EurekaInstanceConfig instance,
				@Autowired(required = false) HealthCheckHandler healthCheckHandler) {
			ApplicationInfoManager appManager;
			if (AopUtils.isAopProxy(manager)) {
				appManager = ProxyUtils.getTargetObject(manager);
			}
			else {
				appManager = manager;
			}
            // 1
			CloudEurekaClient cloudEurekaClient = new CloudEurekaClient(appManager,
					config, this.optionalArgs, this.context);
			cloudEurekaClient.registerHealthCheck(healthCheckHandler);
			return cloudEurekaClient;
		}
這裡會自動裝配一個EurekaClient類型的bean,(從返回值可以看出來),而具體的類型呢,從上面的1處,可以看出,具體類型是CloudEurekaClient。
所以,我們開始看1處,這個CloudEurekaClient是怎麼new出來的。
CloudEurekaClient的創建
先看看其繼承結構:
我們這個CloudEurekaClient,位於spring-cloud-netflix-eureka-client-2.1.5.RELEASE包。
而其父類DiscoveryClient和接口EurekaClient,位於eureka-client-1.9.13包
大致能分析出,CloudEurekaClient的底層實現是eureka,其本身,是一個膠水,集成 spring 和 Netflix。
CloudEurekaClient的構造函數
	public CloudEurekaClient(ApplicationInfoManager applicationInfoManager,
			EurekaClientConfig config, AbstractDiscoveryClientOptionalArgs<?> args,
			ApplicationEventPublisher publisher) {
        // 1
		super(applicationInfoManager, config, args);
        // 2
		this.applicationInfoManager = applicationInfoManager;
		this.publisher = publisher;
		this.eurekaTransportField = ReflectionUtils.findField(DiscoveryClient.class,
				"eurekaTransport");
		ReflectionUtils.makeAccessible(this.eurekaTransportField);
	}
我們看1處,調用了父類的構造函數;2處下面的幾行,主要是對本類中的幾個field進行賦值,這幾個字段,我們不關心,所以,直接看父類的構造函數吧。
DiscoveryClient的構造函數
    public DiscoveryClient(ApplicationInfoManager applicationInfoManager, final EurekaClientConfig config, AbstractDiscoveryClientOptionalArgs args) {
        this(applicationInfoManager, config, args, ResolverUtils::randomize);
    }
    public DiscoveryClient(ApplicationInfoManager applicationInfoManager, final EurekaClientConfig config, AbstractDiscoveryClientOptionalArgs args, EndpointRandomizer randomizer) {
        // 1
        this(applicationInfoManager, config, args, null, randomizer);
    }
上面兩個,都是重載。1處調用的,我們接下來會重點分析。
步驟1:一堆field賦值
DiscoveryClient(ApplicationInfoManager applicationInfoManager, EurekaClientConfig config, AbstractDiscoveryClientOptionalArgs args,
                    Provider<BackupRegistry> backupRegistryProvider, EndpointRandomizer endpointRandomizer) {
    	// 0
        if (args != null) {
            this.healthCheckHandlerProvider = args.healthCheckHandlerProvider;
            this.healthCheckCallbackProvider = args.healthCheckCallbackProvider;
            this.eventListeners.addAll(args.getEventListeners());
            this.preRegistrationHandler = args.preRegistrationHandler;
        } else {
            this.healthCheckCallbackProvider = null;
            this.healthCheckHandlerProvider = null;
            this.preRegistrationHandler = null;
        }

        this.applicationInfoManager = applicationInfoManager;
        InstanceInfo myInfo = applicationInfoManager.getInfo();
		// 1
        clientConfig = config;
        staticClientConfig = clientConfig;
        transportConfig = config.getTransportConfig();
        instanceInfo = myInfo;
        if (myInfo != null) {
            appPathIdentifier = instanceInfo.getAppName() + "/" + instanceInfo.getId();
        } else {
            logger.warn("Setting instanceInfo to a passed in null value");
        }
		...
這一堆都是根據入數,來對類中的field進行賦值。比如
0處,主要是一些健康檢查的東西;1處,config類型為 com.netflix.discovery.EurekaClientConfig,這裏主要是eureka client的一些配置,比如我們在yml中配置了eureka.client.*之類的,就會到這裏。
步驟2:判斷是否要獲取eureka server中的服務提供者信息
	// 1
	if (config.shouldFetchRegistry()) {
            this.registryStalenessMonitor = new ThresholdLevelsMetric(this, METRIC_REGISTRY_PREFIX + "lastUpdateSec_", new long[]{15L, 30L, 60L, 120L, 240L, 480L});
        } else {
            this.registryStalenessMonitor = ThresholdLevelsMetric.NO_OP_METRIC;
        }
1處,可以看出來,是根據config中的shouldFetchRegistry進行判斷,是否要去獲取eureka server。
然後進行了一些監控指標的初始化。
步驟3:判斷是否要註冊到eureka server
    	// 1
		if (config.shouldRegisterWithEureka()) {
            this.heartbeatStalenessMonitor = new ThresholdLevelsMetric(this, METRIC_REGISTRATION_PREFIX + "lastHeartbeatSec_", new long[]{15L, 30L, 60L, 120L, 240L, 480L});
        } else {
            this.heartbeatStalenessMonitor = ThresholdLevelsMetric.NO_OP_METRIC;
        }
同上。
步驟4:如果既不註冊,也不獲取,則處理基本結束
		// 1
		if (!config.shouldRegisterWithEureka() && !config.shouldFetchRegistry()) {
            logger.info("Client configured to neither register nor query for data.");
            scheduler = null;
            heartbeatExecutor = null;
            cacheRefreshExecutor = null;
            eurekaTransport = null;
            instanceRegionChecker = new InstanceRegionChecker(new PropertyBasedAzToRegionMapper(config), clientConfig.getRegion());

            DiscoveryManager.getInstance().setDiscoveryClient(this);
            DiscoveryManager.getInstance().setEurekaClientConfig(config);
			// 2
            return;  // no need to setup up an network tasks and we are done
        }
- 1處,既不註冊,也不從eureka server獲取
- 2處,直接結束
步驟5:定義三個線程池
            //1 default size of 2 - 1 each for heartbeat and cacheRefresh
            scheduler = Executors.newScheduledThreadPool(2,
                    new ThreadFactoryBuilder()
                            .setNameFormat("DiscoveryClient-%d")
                            .setDaemon(true)
                            .build());
			// 2
            heartbeatExecutor = new ThreadPoolExecutor(
                    1, clientConfig.getHeartbeatExecutorThreadPoolSize(), 0, TimeUnit.SECONDS,
                    new SynchronousQueue<Runnable>(),
                    new ThreadFactoryBuilder()
                            .setNameFormat("DiscoveryClient-HeartbeatExecutor-%d")
                            .setDaemon(true)
                            .build()
            );  // use direct handoff
			// 3
			cacheRefreshExecutor = new ThreadPoolExecutor(
                    1, clientConfig.getCacheRefreshExecutorThreadPoolSize(), 0, TimeUnit.SECONDS,
                    new SynchronousQueue<Runnable>(),
                    new ThreadFactoryBuilder()
                            .setNameFormat("DiscoveryClient-CacheRefreshExecutor-%d")
                            .setDaemon(true)
                            .build()
            );  // use direct handoff
- 1處,定義一個用於服務提供者信息的緩存刷新的定時線程池
- 2處,定義一個心跳線程池
- 3處,這個看起來也是用於緩存刷新的
步驟6:創建eurekaTransport對象
com.netflix.discovery.DiscoveryClient#scheduleServerEndpointTask
// 1
eurekaTransport = new EurekaTransport();
// 2
scheduleServerEndpointTask(eurekaTransport, args);
-
1處,eurekaTransport是一個field,該類主要封裝了幾個後續通信要使用的底層client。
    private static final class EurekaTransport {
        private ClosableResolver bootstrapResolver;
        private TransportClientFactory transportClientFactory;
		// 1.1
        private EurekaHttpClient registrationClient;
        private EurekaHttpClientFactory registrationClientFactory;
		// 1.2
        private EurekaHttpClient queryClient;
        private EurekaHttpClientFactory queryClientFactory;
1.1處,這個應該是註冊用的,也是我們需要的;
1.2處,應該是查詢信息用的。
-
調用了當前類的方法scheduleServerEndpointTask,且把eurekaTransport傳入了
步驟7:schedule周期任務
創建抽象工廠
因我們只是new了eurekaTransport,沒有對其field進行任何賦值,所以,這個scheduleServerEndpointTask總,有個地方對其field進行賦值。
com.netflix.discovery.DiscoveryClient#scheduleServerEndpointTask
// 1
TransportClientFactories transportClientFactories =new Jersey1TransportClientFactories();

// 2
eurekaTransport.transportClientFactory = transportClientFactories.newTransportClientFactory(clientConfig, additionalFilters, applicationInfoManager.getInfo(), sslContext, hostnameVerifier)
-
1處,就是new了一個抽象工廠,抽象工廠,我個人理解是工廠的工廠,其產出的東西,不是直接的最終對象,而是另一種工廠。
TransportClientFactories 是一個接口,主要包含了如下方法:
※推薦評價好的iphone維修中心
擁有專業的維修技術團隊,同時聘請資深iphone手機維修專家,現場說明手機問題,快速修理,沒修好不收錢
	public TransportClientFactory newTransportClientFactory(
        	final EurekaClientConfig clientConfig,
        	final Collection<F> additionalFilters,
            final InstanceInfo myInstanceInfo,
            final Optional<SSLContext> sslContext,
            final Optional<HostnameVerifier> hostnameVerifier);
主要5個參數,排除掉最後的倒數2個,可選參數,剩3個。分別是:eurekaClient的配置bean,額外的filter集合,當前實例信息。
具體工廠的職責
-
2處,就是利用1處創建的抽象工廠,來生成我們需要的工廠。
這裏,我們可以先看看,最終我們需要的工廠,是什麼樣的。
/**
 * A low level client factory interface. Not advised to be used by top level consumers.
 *
 * @author David Liu
 */
public interface TransportClientFactory {

    EurekaHttpClient newClient(EurekaEndpoint serviceUrl);

    void shutdown();

}
newClient這個方法,聽名字,就是一個創建客戶端的,創建客戶端,需要什麼參數呢?總得知道要連接到哪個eureka server服務器吧,服務器地址是啥吧?沒錯,參數
EurekaEndpoint serviceUrl可以給我們提供需要的這些:package com.netflix.discovery.shared.resolver; public interface EurekaEndpoint extends Comparable<Object> { // 1 String getServiceUrl(); // 2 String getNetworkAddress(); // 3 int getPort(); boolean isSecure(); String getRelativeUri(); }- 1處,獲取url
- 2處,獲取網絡地址
- 3處,獲取端口
基本對於我們一個客戶端來說,需要的參數就這些。
說完了newClient的參數,再來看看響應:
/**
 * Low level Eureka HTTP client API.
 *
 * @author Tomasz Bak
 */
public interface EurekaHttpClient {

    EurekaHttpResponse<Void> register(InstanceInfo info);

    EurekaHttpResponse<Void> cancel(String appName, String id);

    EurekaHttpResponse<InstanceInfo> sendHeartBeat(String appName, String id, InstanceInfo info, InstanceStatus overriddenStatus);

    EurekaHttpResponse<Void> statusUpdate(String appName, String id, InstanceStatus newStatus, InstanceInfo info);

    EurekaHttpResponse<Void> deleteStatusOverride(String appName, String id, InstanceInfo info);

    EurekaHttpResponse<Applications> getApplications(String... regions);

    EurekaHttpResponse<Applications> getDelta(String... regions);

    EurekaHttpResponse<Applications> getVip(String vipAddress, String... regions);

    EurekaHttpResponse<InstanceInfo> getInstance(String appName, String id);

    EurekaHttpResponse<InstanceInfo> getInstance(String id);

    void shutdown();
}
看到了嗎,各種註冊、取消、發送心跳、狀態更新啥的,這幾本涵蓋了eureka client的所有操作了,沒錯,我們就是需要這麼個東西。
創建具體工廠
看完了我們需要的工廠的功能,我們馬上來看看這麼厲害的工廠怎麼創建出來?
com.netflix.discovery.shared.transport.jersey.Jersey1TransportClientFactories#newTransportClientFactory(...)

	@Override
    public TransportClientFactory newTransportClientFactory(
        	EurekaClientConfig clientConfig,
            Collection<ClientFilter> additionalFilters,
        	InstanceInfo myInstanceInfo,
        	Optional<SSLContext> sslContext,
        	Optional<HostnameVerifier> hostnameVerifier) {
    	// 2.1
        final TransportClientFactory jerseyFactory = JerseyEurekaHttpClientFactory.create(
                clientConfig,
                additionalFilters,
                myInstanceInfo,
                new EurekaClientIdentity(myInstanceInfo.getIPAddr()),
                sslContext,
                hostnameVerifier
        );
        // 2.2
        final TransportClientFactory metricsFactory = MetricsCollectingEurekaHttpClient.createFactory(jerseyFactory);
		// 2.3
        return new TransportClientFactory() {
            @Override
            public EurekaHttpClient newClient(EurekaEndpoint serviceUrl) {
                return metricsFactory.newClient(serviceUrl);
            }

            @Override
            public void shutdown() {
                metricsFactory.shutdown();
                jerseyFactory.shutdown();
            }
        };
    }
- 2.1處,調用JerseyEurekaHttpClientFactory的create 靜態方法,生成了一個工廠
- 2.2處,對生成的工廠,進行了包裝,看名稱,應該是包裝了統計相關信息。
- 2.3處,對2.2處生成的工廠,用匿名內部類進行了包裝,調用匿名內部類的newClient時,直接代理給了metricsFactory;而shutdown方法,則主要是關閉 metricsFactory 和 jerseyFactory 工廠。
所以,我們現在要看看,2.1處,是怎麼創建工廠的。
com.netflix.discovery.shared.transport.jersey.JerseyEurekaHttpClientFactory#create

    public static JerseyEurekaHttpClientFactory create(
    	EurekaClientConfig clientConfig,
        Collection<ClientFilter> additionalFilters,
    	InstanceInfo myInstanceInfo,                                                       		 AbstractEurekaIdentity clientIdentity) {
        // 1
    	boolean useExperimental = "true".equals(clientConfig.getExperimental("JerseyEurekaHttpClientFactory.useNewBuilder"));
		// 2
        JerseyEurekaHttpClientFactoryBuilder clientBuilder = (useExperimental ? experimentalBuilder() : newBuilder())
                .withAdditionalFilters(additionalFilters)
                .withMyInstanceInfo(myInstanceInfo)
                .withUserAgent("Java-EurekaClient")
                .withClientConfig(clientConfig)
                .withClientIdentity(clientIdentity);
    	// 3
        clientBuilder.withClientName("DiscoveryClient-HTTPClient");
		// 4
        return clientBuilder.build();
    }
- 1處,砍斷是否要使用實驗性的builder
- 2處,創建對應的builder,並把我們的參數,通過with*方法,設置進去
- 3處,設置客戶端名稱
- 4處,生成客戶端工廠
com.netflix.discovery.shared.transport.jersey.JerseyEurekaHttpClientFactory.JerseyEurekaHttpClientFactoryBuilder#build


        @Override
        public JerseyEurekaHttpClientFactory build() {
    		// 1
            Map<String, String> additionalHeaders = new HashMap<>();
    		// 2
            if (allowRedirect) {
                additionalHeaders.put(HTTP_X_DISCOVERY_ALLOW_REDIRECT, "true");
            }
            if (EurekaAccept.compact == eurekaAccept) {
                additionalHeaders.put(EurekaAccept.HTTP_X_EUREKA_ACCEPT, eurekaAccept.name());
            }

            // 3
            return buildLegacy(additionalHeaders, systemSSL);
        }
這裏就是弄了個hashmap,設置了幾個header進去,然後3處,調用buildLegacy。
com.netflix.discovery.shared.transport.jersey.JerseyEurekaHttpClientFactory.JerseyEurekaHttpClientFactoryBuilder#buildLegacy

        private JerseyEurekaHttpClientFactory buildLegacy(Map<String, String> additionalHeaders, boolean systemSSL) {
    		// 1
            EurekaJerseyClientBuilder clientBuilder = new EurekaJerseyClientBuilder()
                    .withClientName(clientName)
                    .withUserAgent("Java-EurekaClient")
                    .withConnectionTimeout(connectionTimeout)
                    .withReadTimeout(readTimeout)
                    .withMaxConnectionsPerHost(maxConnectionsPerHost)
                    .withMaxTotalConnections(maxTotalConnections)
                    .withConnectionIdleTimeout((int) connectionIdleTimeout)
                    .withEncoderWrapper(encoderWrapper)
                    .withDecoderWrapper(decoderWrapper);
			...

			// 2
            EurekaJerseyClient jerseyClient = clientBuilder.build();
    		// 3
            ApacheHttpClient4 discoveryApacheClient = jerseyClient.getClient();
            addFilters(discoveryApacheClient);
			// 4
            return new JerseyEurekaHttpClientFactory(jerseyClient, additionalHeaders);
        }
-
1處,通過我們傳入的一些參數,以及該類自身的一些field,比如connectionTimeout、readTimeout、maxTotalConnections、maxConnectionsPerHost這些,構造一個builder。
這些參數,已經看出來,是網絡通信所需要的東西了
-
2處,通過1處的builder,調用build,拿到了EurekaJerseyClient類型的對象,可以說,這裏其實是已經把客戶端構造好了。也就是說,在構造這個工廠的過程中,其實已經在生成對應的產品了
-
3處,對2處拿到的客戶端,做一些處理
-
4處,將2處拿到的客戶端,封裝到了工廠的一些field中,後續調用工廠生產產品的時候,直接從field中取就行了。
    public JerseyEurekaHttpClientFactory(EurekaJerseyClient jerseyClient, Map<String, String> additionalHeaders) {
        this(jerseyClient, null, -1, additionalHeaders);
    }
	private JerseyEurekaHttpClientFactory(EurekaJerseyClient jerseyClient,
                                          ApacheHttpClient4 apacheClient,
                                          long connectionIdleTimeout,
                                          Map<String, String> additionalHeaders) {
        this.jerseyClient = jerseyClient;
        this.apacheClient = jerseyClient != null ? jerseyClient.getClient() : apacheClient;
        this.additionalHeaders = additionalHeaders;
    }
所以,我們的重點,要放在2處的build身上。
	com.netflix.discovery.shared.transport.jersey.EurekaJerseyClientImpl.EurekaJerseyClientBuilder#build
	public EurekaJerseyClient build() {
            MyDefaultApacheHttpClient4Config config = new MyDefaultApacheHttpClient4Config();
            try {
                // 1
                return new EurekaJerseyClientImpl(connectionTimeout, readTimeout, connectionIdleTimeout, config);
            } catch (Throwable e) {
                throw new RuntimeException("Cannot create Jersey client ", e);
            }
        }
接下來看1處:
public EurekaJerseyClientImpl(int connectionTimeout, int readTimeout, final int connectionIdleTimeout,ClientConfig clientConfig) {
        try {
            jerseyClientConfig = clientConfig;
            // 1
            apacheHttpClient = ApacheHttpClient4.create(jerseyClientConfig);
            // 2
            HttpParams params = apacheHttpClient.getClientHandler().getHttpClient().getParams();

            HttpConnectionParams.setConnectionTimeout(params, connectionTimeout);
            HttpConnectionParams.setSoTimeout(params, readTimeout);

        } catch (Throwable e) {
            throw new RuntimeException("Cannot create Jersey client", e);
        }
    }
-
1處,創建com.sun.jersey.client.apache4.ApacheHttpClient4類型的對象
該類型,就位於:
    <dependency>
      <groupId>com.sun.jersey.contribs</groupId>
      <artifactId>jersey-apache-client4</artifactId>
      <version>1.19.1</version>
      <scope>runtime</scope>
    </dependency>
public static ApacheHttpClient4 create(final ClientConfig cc) { return new ApacheHttpClient4(createDefaultClientHandler(cc), cc); }這裏的createDefaultClientHandler(cc),裏面會去創建HttpClient。
private static ApacheHttpClient4Handler createDefaultClientHandler(final ClientConfig cc) {
		...

		// 1
        final DefaultHttpClient client = new DefaultHttpClient(
                (ClientConnectionManager)connectionManager,
                (HttpParams)httpParams
        );

        ...

        return new ApacheHttpClient4Handler(client, cookieStore, preemptiveBasicAuth);
    }
這裏面細節省略了部分,主要就是1處,創建了HttpClient,這個就是平時我們用來發http請求的那個。
-
2處,設置一些參數,這裏的HttpParams,從哪兒取出來的?
apacheHttpClient.getClientHandler().getHttpClient()。這裏取到的,已經是HttpClient了。到此為止,我們可以看看httpParams中有哪些header:
在具體工廠基礎上,對註冊用的工廠進行封裝
        com.netflix.discovery.DiscoveryClient#scheduleServerEndpointTask
        // 1
		if (clientConfig.shouldRegisterWithEureka()) {
            EurekaHttpClientFactory newRegistrationClientFactory = null;
            EurekaHttpClient newRegistrationClient = null;
            // 2
            newRegistrationClientFactory = EurekaHttpClients.registrationClientFactory(
                eurekaTransport.bootstrapResolver,
                eurekaTransport.transportClientFactory,
                transportConfig
            );
            // 3
            newRegistrationClient = newRegistrationClientFactory.newClient();
            // 4
            eurekaTransport.registrationClientFactory = newRegistrationClientFactory;
            eurekaTransport.registrationClient = newRegistrationClient;
        }
我們前面的n步,已經把通信用的客戶端,及對應的工廠,都已經創建出來了,為啥這裏又要創建什麼工廠。
簡單來說,前面的工廠,造出來的客戶端,通信是沒問題了;但是,你通信失敗了,要重試嗎,重試的話,換哪一台呢?你每次通信是成功,還是失敗,還是超時,需要統計嗎?一個生產級的框架,是要有這些功能的。
所以,這裏主要是進行一些上層的封裝。
ok,繼續分析上面的代碼。
- 1處,判斷是否要註冊到eureka
- 2處,生成一個工廠,該工廠負責生產:註冊用的客戶端
- 3處,使用2處拿到的工廠,創建註冊用的客戶端
- 4處,把3處拿到的客戶端,存儲到eurekaTransport的field中。
繼續深入2處。
    com.netflix.discovery.shared.transport.EurekaHttpClients#canonicalClientFactory
	static EurekaHttpClientFactory canonicalClientFactory(
        final String name,
        final EurekaTransportConfig transportConfig,
        final ClusterResolver<EurekaEndpoint> clusterResolver,
        final TransportClientFactory transportClientFactory) {
		// 1
        return new EurekaHttpClientFactory() {
            // 2
            @Override
            public EurekaHttpClient newClient() {
                // 3
                return new SessionedEurekaHttpClient(
                        name,
                        RetryableEurekaHttpClient.createFactory(...),
                        transportConfig.getSessionedClientReconnectIntervalSeconds() * 1000
                );
            }

            @Override
            public void shutdown() {
                wrapClosable(clusterResolver).shutdown();
            }
        };
    }
- 1處,返回了一個工廠對象
- 2處,工廠里重寫了newClient
- 3處,返回了一個包裝過的EurekaClient。
可以看下這裏返回的SessionedEurekaHttpClient類。
這裏就是裝飾器模式,對enreka進行了層層封裝,和 java 的 io 流那樣理解就對了。
在具體工廠基礎上,對查詢用的工廠進行封裝
		// 1
		if (clientConfig.shouldFetchRegistry()) {
            EurekaHttpClientFactory newQueryClientFactory = null;
            EurekaHttpClient newQueryClient = null;
            // 2
            newQueryClientFactory = EurekaHttpClients.queryClientFactory(
                eurekaTransport.bootstrapResolver,
                eurekaTransport.transportClientFactory,
                clientConfig,
                transportConfig,
                applicationInfoManager.getInfo(),
                applicationsSource,
                endpointRandomizer
            );
            // 3
            newQueryClient = newQueryClientFactory.newClient();
            eurekaTransport.queryClientFactory = newQueryClientFactory;
            eurekaTransport.queryClient = newQueryClient;
        }
這裏的代碼,和上面基本相似。只不過,這裡是給查詢用的,所謂查詢,就是去eureka server獲取信息,比如服務提供者列表啥的。
- 1處,判斷是否要去eureka server獲取
- 2處,創建查詢用的工廠
- 3處,利用2處拿到的工廠,創建查詢客戶端
步驟8:去eureka server獲取服務提供者信息
我們終於把步驟7講完了,實在有點長。
com.netflix.discovery.DiscoveryClient#DiscoveryClient(...)

// 1
if (clientConfig.shouldFetchRegistry() && !fetchRegistry(false)) {
    // 2
    fetchRegistryFromBackup();
}
這裏1處,就是判斷要不要去獲取,如果要的話,就調用fetchRegistry(false)。
2處,如果1處沒取到,則要從backup地方去取。這塊可以自己定製backup策略。
註冊到eureka server
        if (clientConfig.shouldRegisterWithEureka() && clientConfig.shouldEnforceRegistrationAtInit()) {
            // 1
            if (!register() ) {
                throw new IllegalStateException("Registration error at startup. Invalid server response.");
            }
        }
這裡會判斷是否要註冊,是否要在初始化的時候註冊,如果要的話,進入1處,進行註冊。
初始化周期執行的任務
        // finally, init the schedule tasks (e.g. cluster resolvers, heartbeat, instanceInfo replicator, fetch
        initScheduledTasks();
看這裏註釋,初始化的任務包括:集群解析、心跳、實例信息註冊、周期從eureka server獲取信息等。
周期任務:獲取服務提供者信息
if (clientConfig.shouldFetchRegistry()) {
            // registry cache refresh timer
            int registryFetchIntervalSeconds = clientConfig.getRegistryFetchIntervalSeconds();
            int expBackOffBound = clientConfig.getCacheRefreshExecutorExponentialBackOffBound();
            scheduler.schedule(
                    new TimedSupervisorTask(
                            "cacheRefresh",
                            scheduler,
                            cacheRefreshExecutor,
                            registryFetchIntervalSeconds,
                            TimeUnit.SECONDS,
                            expBackOffBound,
                            new CacheRefreshThread()
                    ),
                    registryFetchIntervalSeconds, TimeUnit.SECONDS);
        }
默認30s一次。
周期任務:定時發心跳,向eureka server進行renew
            int renewalIntervalInSecs = instanceInfo.getLeaseInfo().getRenewalIntervalInSecs();
            int expBackOffBound = clientConfig.getHeartbeatExecutorExponentialBackOffBound();
            logger.info("Starting heartbeat executor: " + "renew interval is: {}", renewalIntervalInSecs);

            // Heartbeat timer
            scheduler.schedule(
                    new TimedSupervisorTask(
                            "heartbeat",
                            scheduler,
                            heartbeatExecutor,
                            renewalIntervalInSecs,
                            TimeUnit.SECONDS,
                            expBackOffBound,
                            new HeartbeatThread()
                    ),
                    renewalIntervalInSecs, TimeUnit.SECONDS);
這個也是30s。
心跳包,基本就是個put請求,裏面攜帶了2個參數。
@Override
    public EurekaHttpResponse<InstanceInfo> sendHeartBeat(String appName, String id, InstanceInfo info, InstanceStatus overriddenStatus) {
        String urlPath = "apps/" + appName + '/' + id;
        ClientResponse response = null;
        try {
            WebResource webResource = jerseyClient.resource(serviceUrl)
                    .path(urlPath)
                    .queryParam("status", info.getStatus().toString())
                    .queryParam("lastDirtyTimestamp", info.getLastDirtyTimestamp().toString());
周期任務:InstanceInfoReplicator
這個任務,默認也是30s執行一次。
            instanceInfoReplicator = new InstanceInfoReplicator(
                    this,
                    instanceInfo,
                    clientConfig.getInstanceInfoReplicationIntervalSeconds(),
                    2); // burstSize
這個任務,其實現了runnable,註釋如下:
/**
 * A task for updating and replicating the local instanceinfo to the remote server. Properties of this task are:
 * - 1 configured with a single update thread to guarantee sequential update to the remote server
 * - 2 update tasks can be scheduled on-demand via onDemandUpdate()
 * - 3 task processing is rate limited by burstSize
 * - 4 a new update task is always scheduled automatically after an earlier update task.  However if an on-demand task is started, the scheduled automatic update task is discarded (and a new one will be scheduled after the new
 *   on-demand update).
 *
 *   @author dliu
 */
class InstanceInfoReplicator implements Runnable
- 1處,配置了一個單線程,保證向遠程eureka server,順序更新
- 2處,通過本類的onDemandUpdate,可以強行插入一個任務,而無需通過定時執行
- 3處,限流相關
- 4處,執行完一個周期任務后,馬上會給自己安排下一個周期任務
其run方法:
    public void run() {
        try {
            // 1
            discoveryClient.refreshInstanceInfo();

            Long dirtyTimestamp = instanceInfo.isDirtyWithTime();
            if (dirtyTimestamp != null) {
                // 2
                discoveryClient.register();
                instanceInfo.unsetIsDirty(dirtyTimestamp);
            }
        }finally {
            // 3
            Future next = scheduler.schedule(this, replicationIntervalSeconds, TimeUnit.SECONDS);
            scheduledPeriodicRef.set(next);
        }
    }
- 1處,刷新實例信息
- 2處,如果有需要的話,向eureka server進行註冊
- 3處,調度下一次任務
初始化結束
基本,這個CloudEurekaClient構造就結束了,後續就依靠其開啟的一堆定時任務去進行工作。
總結
eureka client的初始化就講了這麼多,註冊還沒講,留帶下一講吧。
本站聲明:網站內容來源於博客園,如有侵權,請聯繫我們,我們將及時處理
※網頁設計最專業,超強功能平台可客製化
窩窩以「數位行銷」「品牌經營」「網站與應用程式」「印刷品設計」等四大主軸,為每一位客戶客製建立行銷脈絡及洞燭市場先機。